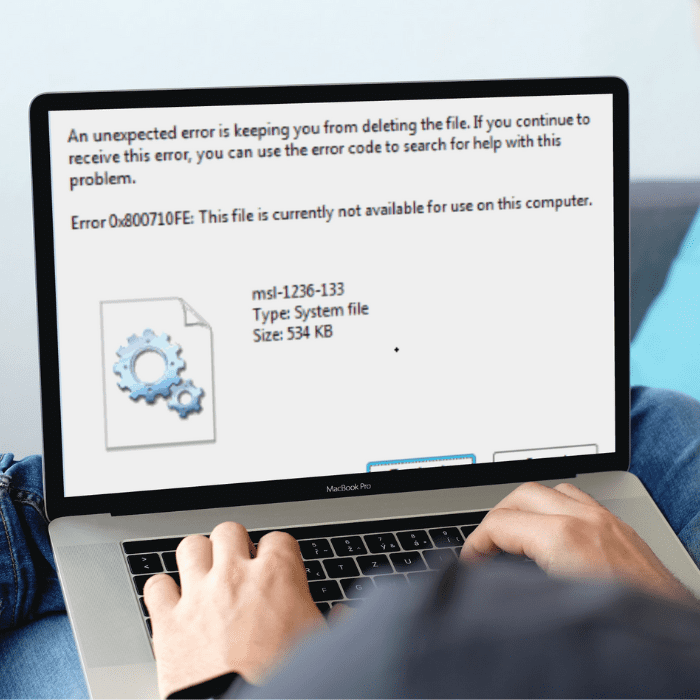
Error 0x800710FE indicates that Windows is unable to access the file through the local offline files cache. In other words, it’s a common synchronization issue that can have several causes – from administrator permissions to cache corruption – and requires specific solutions. Below, we list the main reasons for this error and how to fix it safely and effectively. Need to recover important files? Bot® Data Recovery, a multinational company with over a decade of experience and 200.000+ resolved cases, is a global reference in this area: count on our own WhiteRoom® lab and team of specialists. Start your data recovery now.
What causes Error 0x800710FE in Windows?
This error can arise for various reasons. It is generally associated with Windows’ “Offline Files” feature or permission and file integrity issues. In short, the most common causes include:
Office file synchronization is not enabled by default
When file synchronization (such as Microsoft Office files) is not enabled, local changes are not properly propagated. Microsoft clarifies that synchronization ensures that “copies reflect recent changes”; without it, the file may be inaccessible in the cache, causing error 0x800710FE when trying to delete. Therefore, make sure Offline Files Sync is active in the Control Panel.
When copying files from a network
This error also frequently occurs with network shares. If you tried to delete a file originating from a remote server without administrator permission, Windows may block it with error 0x800710FE. In corporate networks, only authorized users have rights to edit shared files. Without that permission, the deletion action fails.
The user does not have editing control over the file
Likewise, if the file belongs to another user or an administrator, you will receive this error when trying to remove it. Lack of editing privileges (such as in protected folders or critical system files) may prevent changes, resulting in the error message. Always check whether your user account has full control of the file.
There are corrupted, damaged, or missing files
Corrupted files or errors in the file system can trigger error 0x800710FE. For example, if the document is damaged or missing due to a previous failure, Windows cannot complete the delete operation. In such cases, the solution is to check disk and file integrity (e.g., using CHKDSK) before trying to delete or move the file.
The system is infected with malware
Malware and viruses can damage files or change permissions without your knowledge. If there was a recent infection, error 0x800710FE may be the result of malicious processes blocking access to certain files. We recommend running a full system scan and using trusted cleaning tools before proceeding with any other steps.
How to fix Error 0x800710FE?
Now that you know the main causes of 0x800710FE, let’s look at the most effective solutions. Often it’s not possible to determine the exact cause, so we present five safe methods to fix the error. Choose one option at a time and test after each procedure:
Disabling offline files
If Offline Files are enabled, try disabling them. This is one of the first steps recommended by experts. In the Windows Control Panel, go to Sync Center, click on Manage offline files, and disable them in the General tab. Confirm when prompted by User Account Control. This ends local synchronization and usually resolves the error caused by the offline cache.
Using Check Disk utility
If you suspect the file is corrupted, run CHKDSK. Open Command Prompt as administrator and type chkdsk C: /f (replace C: with the appropriate drive). The system will scan and fix disk errors. At the end, restart your PC and check if the error has been resolved. This native Windows tool helps fix file system issues that may cause 0x800710FE.
Using Command Prompt
Another advanced approach is to disable synchronization via command line. Follow the recommended step-by-step:
- Press Win+R, type
cmd, and confirm with Ctrl+Shift+Enter to open the prompt as administrator. - Type and run the command:
for %G in ("CSC", "CscService") do sc config "%~G" start= disabled - Next, run the following commands to reset permissions and clear the offline cache:
takeown /f "%windir%\CSC" /a /r
icacls "%windir%\CSC" /grant:r *S-1-5-32-544:F /t /c /q
icacls "%windir%\CSC" /grant:r *S-1-5-18:F /t /c /q
for /d %G in ("%windir%\CSC\v2.0.6\namespace\*") do rd /s /q "%~G" - Then disable related scheduled tasks:
schtasks /change /tn "\Microsoft\Windows\Offline Files\Background Synchronization" /disable
schtasks /change /tn "\Microsoft\Windows\Offline Files\Logon Synchronization" /disable - Finally, disable synchronization entries in the Windows Registry:
reg add "HKCU\Software\Classes\Local Settings\Software\Microsoft\Windows\CurrentVersion\SyncMgr" /v "StartAtLogin" /t REG_DWORD /d 0 /f
reg add "HKCU\Software\Classes\Local Settings\Software\Microsoft\Windows\CurrentVersion\SyncMgr\HandlerInstances\{750FDF10-2A26-11D1-A3EA-080036587F03}" /v "Active" /t REG_DWORD /d 0 /f
reg delete "HKCU\Software\Microsoft\Windows\CurrentVersion\SyncMgr" /f
reg delete "HKCU\Software\Classes\Local Settings\Software\Microsoft\Windows\CurrentVersion\NetCache" /f
reg delete "HKCU\Software\Classes\Local Settings\Software\Microsoft\Windows\CurrentVersion\SyncMgr\HandlerInstances\{750FDF10-2A26-11D1-A3EA-080036587F03}\SyncItems" /f - Restart the computer and check if the error is gone.
Reset this PC
If nothing else works, consider resetting Windows without losing personal files. Open Windows Recovery settings and choose to restore the PC. However, this is a drastic measure: if you don’t have a backup, you may lose data. We recommend consulting our experts before proceeding. Contact Bot Data Recovery before any reset.
Formatting the CSC database using the Registry
Finally, you can fully reset the offline file cache via the Registry Editor. In Run (Win+R), type regedit and go to HKEY_LOCAL_MACHINE\System\CurrentControlSet\Services\CSC\Parameters. If it doesn’t exist, create the Parameters subkey. In it, create a DWORD value named FormatDatabase with Hexadecimal base set to 1. Save, close the editor, and restart the machine. This “formats” the CSC database and forces Windows to recreate the cache.
Conclusion
Error 0x800710FE does not mean permanent data loss. In most cases, simply identifying the cause (offline sync, permissions, or corruption) and applying the appropriate fix is enough to solve the issue. Review each of the solutions above: one of them will certainly resolve the problem without risk to your system.
If you lose files during the correction process, don’t worry. Bot® Data Recovery can retrieve your data quickly and safely. We are an international reference in file recovery, with our own WhiteRoom® lab and global operation. Start your recovery now or talk to our specialists. We guarantee expert service and 100% professionalism.