A virtual machine (VM) is a valuable solution for companies to expand their ability to manage different operating systems, overcoming physical limitations. In fact, when combined with RAID (Redundant Array of Independent Disks) systems, it becomes a highly efficient tool.
VMs are capable of transforming a single physical server into several virtual servers, making them crucial components.
However, this efficiency has attracted the attention of hacker groups who have developed ransomware specialized in encrypting virtual machines and their files.
After all, they know that nowadays data is essential for any company, making its availability and accessibility vital. Thus, their loss can be devastating for companies.
In addition, various problems can result in the loss of data in VMs, as we’ll cover in this article.
Fortunately, there are methods available for recovering virtual machines – although they are complex and require advanced technical knowledge to avoid complications.
In this context, this blog post also teaches you safe methods for recovering data from your VMs. Read on to find out what these methods are, how to back up virtual machines and much more!

Problems that cause data loss in virtual machines
Several issues can lead to data loss in virtual machines. Some of the main reasons include:
Deleting data
Users can accidentally delete important files within VMs, resulting in data loss.
Formatting partitions
Formatting partitions in VMs can cause data loss due to the complete removal of file and directory management structures from the file system.
When a partition is formatted, all information about the location of files, metadata and directory structures is erased. This results in the previously present data being inaccessible.
Corruption of information
File system failures within the VM can occur due to incorrect shutdowns, power failures or other types of interruptions. This leads to file corruption and data loss.
Overwriting information
Overwriting information can lead to data loss in virtual machines due to the replacement or corruption of existing data.
This occurs when new data is written in places where previously stored information was present.
This problem can occur in various scenarios, such as:
- Shared file system
- Access conflicts
- Simultaneous backup and restore
- Asynchronous synchronization
- Failures in writing processes.
Formatting followed by reinstalling systems
Format a disk, virtual disk, array, LUN, vDisk, volume, etc. and reinstalling the system are additional causes of data loss in virtualized environments.
Specifically in the case of VMs, for example, there may be reformatting at the guest or host level.
Corruption can also occur due to faulty patches and updates without an offline backup. As well as poorly planned implementation of new software, integration problems and database corruption.
These problems can also cause host file corruption and damage to the guest’s file system.
It is also important to consider the possibility of data loss in relation to thin provisioning.
In this case, instead of allocating all the data the VM requires and positioning the file system structures in designated physical locations, dynamic provisioning allocates only the space immediately needed. It does this by adding extra blocks as the virtual disk grows.
This can result in a more complex and fragmented virtual environment on disk.
If the metadata pointers to the data are missing or damaged, it will be a challenge to locate the various fragments and rebuild the virtual disk.
Alternatively, the mapping layer within the virtual disk can be damaged or replaced, making reassembly extremely difficult.
Hardware malfunction
The hardware problems faced by virtual systems are basically the same as those faced by physical systems. For example, failed drives, controllers and server components, as well as power problems.
But RAID corruption is a much bigger challenge with VMs due to the nature of virtualization. Unfortunately, data loss is not uncommon with this type of storage.
The complexity of modern hardware and software RAID is added to by the presence of deduplication and compression. And the additional layer of virtualization increases the likelihood of failure.
This is because RAID controllers are responsible for mapping where all the information resides on the various disks at their disposal.
But if a RAID configuration is corrupted, the files may not be recoverable, requiring a laboratory specializing in RAID recovery.
When this happens, the interconnectivity of several systems can cause significant data loss and downtime.
Simultaneous failure of hard disks in storages
This failure can cause data loss in VMs due to the way these systems are configured for redundancy and data protection.
After all, storages normally use techniques such as RAID to distribute and protect stored data. However, a simultaneous failure of hard disks can compromise data integrity.
How do I recover data from a virtual machine?
Arcserve UDP allows you to use the “Recover VM” option to restore a virtual machine that was previously backed up using host-based agentless backup.
This method helps to restore the entire MVl to its original location in one local ESX or alternative Hyper-V
You can search for virtual machine recovery points from a calendar view and select the recovery point you want to restore.
Read on to follow the step-by-step process of recovering a virtual machine.
Review the prerequisites and considerations for restoration
Before starting a restoration, validate the following prerequisites:
- Valid recovery point: check that there is a valid recovery point for the restore
- Accessible destination server: have an accessible and valid Virtual Center/ESX or Hyper-V server for the virtual machine recovery
- Compatibility: consult the Compatibility Matrix to check supported browsers, databases and operating systems.
Then consider the following information for the restoration:
- Simultaneous restore: The Arcserve UDP Agent (Windows) allows only one restore task at a time. Arcserve UDP, on the other hand, supports multiple simultaneous restore tasks
- Restore in progress: if a restore task is in progress, when you try to start another one manually, you’ll get an alert to try again later
- Destination compatibility: if the restore destination is Windows Server 2008 R2, the source backup VM should not have VHDx disks. After all, they are not supported in Hyper-V on this system
- Backup VM subsystem: for Windows Server 2008 R2 or Win2012 destinations, the backup VM subsystem cannot be generation 2. This is because this generation is not compatible with Windows Server 2012/2008 R2 Hyper-V.
- Restore on ESXi 5.5: it is impossible to restore VMs on an ESXi 5.5 if a proxy server with an x86 operating system is used. This is due to the need for VMware VDDK 5.5.x, which is not supported on x86 operating systems.
- Proxy server alternative: if the proxy server is x86, the Arcserve UDP Agent (Windows) will use VDDK 5.1.2. After all, VDDK 5.5.x is not compatible with x86.
With this, you’ll have everything you need to carry out a successful restore, ensuring compatibility and avoiding problems during recovery.
Specify the information of the virtual machine to be restored
It is possible to recover an entire virtual machine from a recovery point.
The process involved in restoring a virtual machine is as follows:
Specify the virtual machine and recovery point to restore to
The “Restore VM” option is used to recover a virtual machine from a previous backup made with Arcserve UDP.
This method is ideal for quickly creating a virtual machine from a recovery point on the ESX or Hyper-V platform.
The restored VM can be easily started to finish the recovery process. To perform this restore, follow the steps below:
- Access the restore method selection dialog box:
- In Arcserve UDP:
- Log in to Arcserve UDP
- Go to the “Resources” tab and select “All nodes”
- In Arcserve UDP:
- Choose the node you want and click on “Actions”, followed by “Restore”.
- In the Arcserve UDP Agent (Windows):
- Log in to the Arcserve UDP Agent
- On the home page, select “Restore” and then “Restore VM”.
- Defining the backup source:
- Click on “Change” to modify the backup location
- Choose the location of the backup images and provide the necessary credentials
- Select the recovery points folder.
- Selecting the recovery point:
- Specify the “Recovery point server” settings and click “Update”
- Select the desired node from the list displayed
- Choose the virtual machine to be recovered from the drop-down list
- In the calendar, dates with recovery points are highlighted.
- Choosing the recovery point:
- Select the date in the calendar for the virtual machine
- Choose an available recovery point.
- Restoration options:
- Click “Next” to access the “Restore Options” dialog box
- In this step, the specific options for restoring the virtual machine and the recovery point are configured.
Set the restore options
After identifying the virtual machine and the recovery point for the restore, it is essential to configure the specific options for the chosen virtual machine.
To do this, follow the steps below:
- Defining the destination of the restoration:
- In the “Restore options” dialog box, choose the restore destination
- The options available are “Restore to original location” and “Restore to a different location”
- The default option is to restore to the original location.
- Conflict resolution:
- Specify the “Resolving conflicts” options that Arcserve UDP will perform if conflicts occur during the restore
- The option to replace the existing virtual machine is available. By default, this replacement option is not checked
- If selected, the restore process will replace all existing virtual machine images on the restore target
- Without the option checked, the recovery task will fail if the VM exists in the original location, or it will create a separate image in an alternative location.
- After Recovery” option:
- Check the “After recovery” option. This option determines whether the virtual machine will be turned on after the restore process
- The default setting is not to check this option.
- Selection of the Restoration Destination:
- When configuring the VM recovery process, it is important to select the restore destination
- The options available are “Restore to original location” and “Restore to an alternative location”.
Finally, after choosing the virtual machine and the recovery point, it is essential to configure the appropriate restore options.
This includes choosing the restore destination, setting conflict resolution and determining whether the VM will be powered on after recovery.
Careful selection of these options guarantees an accurate and successful restore of the desired virtual machine.
Set the options for restoring the original site
To restore a virtual machine to its original location, follow the steps below:
- Restore options: in the “Restore options” dialog box, check the “Resolve conflicts” and “After recovery” options. Then select “Restore to original location” and click “Next”. The appropriate dialog box for VMware or Hyper-V will be displayed
- vCenter/ESX Server credentials: for VMware, in the “Set credential for source vCenter/ESX Server” dialog box. Enter the credentials required to access the virtual machine.
-
- Then fill in the fields:
- vCenter/ESX Server: displays the host name/IP address of the target vCenter or ESX server
- VM name: displays the name of the virtual machine to be restored
- Protocol: offers a choice between HTTP and HTTPS for communication with the destination server
- Port number: records the port for transferring data between servers
- Username: contains the name of the user with access to the vCenter/ESX server.
- Password: contains a password corresponding to the user name.
- Then fill in the fields:
- Hyper-V Server/Hyper-V Cluster credentials: for Hyper-V, fill in the relevant fields:
- Hyper-V Server/Hyper-V Cluster: displays the host name or IP address of the target Hyper-V server or Hyper-V cluster
- VM name: displays the name of the virtual machine being restored
- User name: allows you to enter the name of the user with privileges for the Hyper-V server or Hyper-V cluster
- Password: allows you to define a password corresponding to the user name.
- Restore Summary: click on “OK”. The “Restore Summary” dialog box will appear, consolidating the restore options to the original location.
Configure the restore options in the alternative location
To restore a virtual machine to an alternative location or to another data store, you will need to configure the alternative location.
Below are the detailed steps to carry out this process for the alternative location and for Hyper-V:
- Alternative Site Configuration:
- In the “Restore options” dialog box, check the “Resolve conflicts” and “After recovery” options
- Select “Restore to an alternative location”.
- Configuration for VMware:
- The “Restore options” dialog box expands to display the additional alternative restore options
- Fill in the fields for the vCenter/ESX server:
-
- vCenter/ESX Server: specify the hostname or IP address of the target vCenter or ESX server
- Username: enter the access credentials
- Password: set a corresponding password
- Protocol: choose between HTTP and HTTPS for communication
- Port number: choose the port for data transfer.
- Configuration for Hyper-V:
- The “Restore options” dialog box expands to display the additional alternative restore options
- Fill in the fields for the Hyper-V server:
-
- Hyper-V server: specify the hostname or IP address of the target Hyper-V server
- Username: enter access credentials
- Password: set a corresponding password
- Add virtual machine to cluster: select whether to add the restored virtual machine to the Hyper-V cluster.
Data storage configuration (MV → VMWare / MV → Hyper-V)
To complete this step, you will need to configure the data storage of the VM, the virtual machine for VMWare and the VM for Hyper-V.
Finally, you’ll need to validate the recovery summary.
Check out the step-by-step process below:
- MV Data Storage Configuration:
- Specify the VM’s data storage for the recovery or for each virtual disk of the virtual machine
- For each virtual disk, specify the data repository and the type of virtual disk
- Click on “Establish connection to this vCenter/ESX server” or “Establish connection to this Hyper-V server” to verify the credential information
- Once validated, the VM configuration fields will be activated.
- MV configurations for VMware:
- Fill in the fields for the VM configuration. Include the VM name, target ESX server and the resource pool or vApp pool to be used
- Specify the VM’s data storage for each virtual disk, including the data repository and virtual disk type
- Define the network settings.
- MV configurations for Hyper-V:
- Fill in the fields for configuring the VM. Include the name of the VM and the destination path for saving the VM configuration file.
- For each virtual disk, specify the path on the Hyper-V server and the type of virtual disk
- Specify the network settings.
- Restore summary: click on “OK”. The “Restore Summary” dialog box will display the restore options for the alternative location.
Restore the virtual machine
The restore summary helps you review all the restore options you have set and modify them if necessary.
To run it, follow these steps:
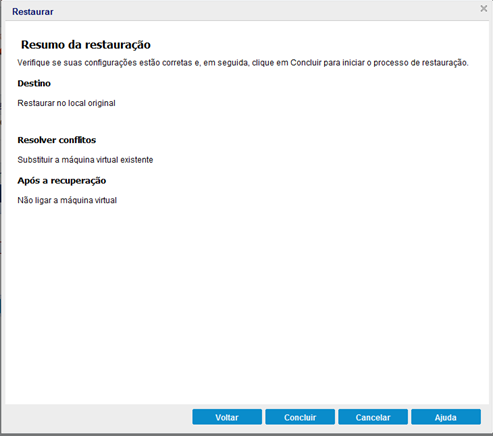
- In the “Restore Summary” dialog box, review the information displayed to check that all the restore options and settings are correct.
Summary of the restoration to the original location:
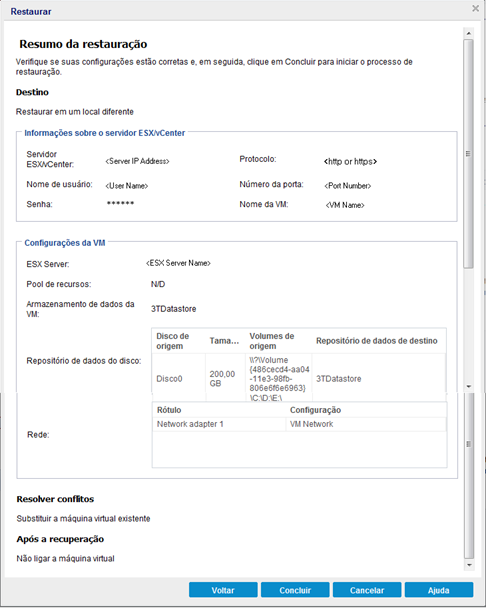
Summary of the restore to the alternative location (VMware):
Summary of the restore to the alternative location (Hyper-V):
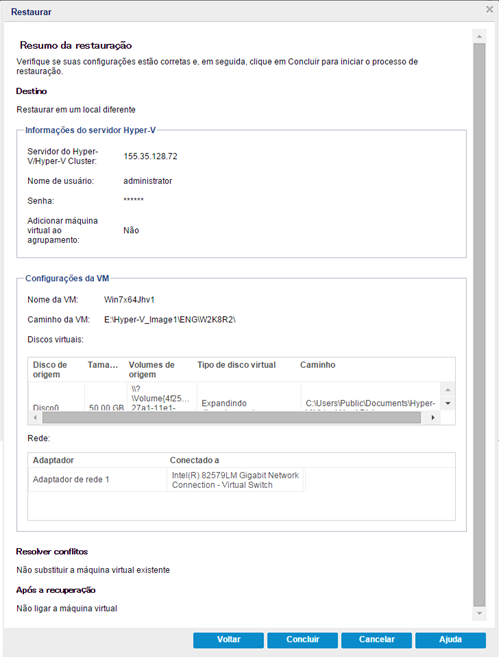
- If the summary information is not correct, click on “Previous” and return to the dialog box in question to correct the incorrect setting
- If the summary information is correct, click on “Finish” to start the restoration process.
Once this is done, your virtual machine will be restored.
Check that the virtual machine has been restored
Once the restore process has been completed, it is essential to confirm that the virtual machine has indeed been recovered at the specified destination.
To do this, follow the procedure described below:
- Access the designated restore location: for example, consider that you have chosen to restore the virtual machine to the original location. In this case, log in to vCenter/ESX or the corresponding Hyper-V Server and check for the presence of the virtual machine
- Restore to alternative location: consider that the option has been selected to restore the virtual machine to an alternative location. This checkmark requires logging in to the alternative vCenter/ESX or Hyper-V Server indicated in the restore options. Finally, confirm that the virtual machine has been properly restored
- Confirm: thoroughly check that the virtual machine has been restored and is available for use.
This way, you can be sure that the restoration of the VM has been successful and is ready for use.
How to recover data from a virtual machine without risking it?
Recovering data from a virtual machine without taking risks involves adopting careful measures and well-planned strategies.
Here are some steps to minimize risks when recovering data from a VM:
- First of all, isolate the affected VM to prevent problems or errors from spreading to other parts of the virtual environment
- Make sure you have a valid and recent backup of the VM before performing any recovery. This ensures that you can return to a safe state in the event of problems
- If possible, create a clone of the affected VM or take a snapshot before attempting virtual machine recovery. This way, you can test the recovery procedures without affecting the original VM
- Understand the cause of the data loss before proceeding with the recovery. That way, you can choose the best approach to recovering the lost data
- Use specific data recovery tools for virtual environments that are compatible with the VM’s file system and the virtualization platform used
- When recovering data, avoid unnecessary writes to the affected VM. Opt for read-only operations to avoid aggravating the situation
- If the recovery involves more complex or risky operations, make a complete backup of the current VM before proceeding. This provides an additional layer of security
- If possible, create an isolated test environment to carry out the recovery procedures. This allows you to evaluate the results without affecting the production environment
- Record all the steps you take during the recovery process. This is useful for future reference and can help identify possible problems
- If the recovery involves complex or risky situations, choose to consult data recovery experts experienced in virtual environments.
How to recover orphaned virtual machines?
In exceptional situations, virtual machines hosted on an ESXi server managed by vCenter Server may find themselves in an orphaned state.
In this scenario, these virtual machines are registered in the vCenter Server database. However, the ESXi server on which they reside can no longer recognize them.
Although this situation is rare, it can occur. This leads to a disconnection between the central management layer (vCenter Server) and the execution nodes (ESXi servers) in the virtualization environment.
Virtual machine orphaning can occur for a variety of reasons. For example, communication failures between vCenter Server and ESXi hosts, unexpected outages or even problems related to data corruption.
When a virtual machine becomes orphaned, it remains listed in the vCenter Server database. However, the ESXi servers are unable to identify or manage its current state.
To resolve this situation, it is necessary to re-establish the connection between vCenter Server and the ESXi server on which the virtual machine is hosted.
This can be done using diagnostic procedures. For example, checking the network settings, analyzing the vCenter Server and ESXi server logs. As well as trying to reactivate the virtual machine within the virtual environment.
Determine the datastore where the MV configuration file is located
In the virtual environment control panel, start the process of locating the virtual machine’s .MVx file.
To do this, browse through the inventory and select the desired virtual machine. Next, access the tab called “Datastores” (Data Repositories).
When you access the Datastores tab, you will see the data repositories in which the virtual machine’s files are stored.
If there are multiple datastores displayed, you need to examine each one. To do this, select each datastore individually and access the Files tab.
At this point, the interface will provide a view of the files present on the selected datastore.
The focus here is to locate the .MVx file, which is crucial for operating the virtual machine. To do this, you need to browse through the datastore’s folders and directories until you find the .MVx file corresponding to the virtual machine in question.
If there is more than one datastore involved, the process of searching for the .MVx file must be repeated for each one.
Once you have identified the .MVx file on the correct datastore, the location and integrity of that file will have been successfully verified.
Remove the virtual machine from the inventory
Return to the virtual machine’s inventory and, by clicking the right mouse button, choose the “Remove from Inventory” option.
Confirm the removal of the virtual machine
Click “Yes” to confirm the removal of the VM.
Register the virtual machine again
Using the right mouse button, access the data repository where the virtual machine file is stored and choose the “Register MV” option.
Then navigate to the .MVx file and confirm the action by clicking the “OK” button.
Next, determine the location of the virtual machine by selecting the appropriate option. Then proceed by clicking on “Next”.
Choose the host on which you want to run the virtual machine and proceed again by clicking “Next”.
Finally, to complete the process, click on the “Finish” button.
How do I back up and recover data from virtual machines?
Backing up virtual machines involves the procedure of creating backup copies of virtual machines in operation.
These backup replicas safeguard applications and data in the event of failures or catastrophic events. This prevents the interruption of services and, consequently, the corruption or loss of information.
A backup operation for virtual machines generally includes a complete image of the VM, including the operating system, applications and relevant data.
These images should be stored in secure locations, such as external storage systems or cloud-based backup solutions. This ensures that they are ready to restore the environment in the event of an emergency.
It’s important to note that backing up virtual machines differs significantly from traditional file copies.
This is because the backup of VMs must be carried out to guarantee the continuity and integrity of services. Especially in adverse situations or unexpected disasters.
That said, to recover information from a virtual machine, keep the backups up to date and follow these steps:
- Choose software: opt for mentioned solutions or tools integrated with the hypervisor (Hyper-V, VMware, VirtualBox, etc.)
- Configure VM protection: select the VM, adjust copy options such as frequency and destination
- Choose a destination location: opt for a local server, storage or NAS, or consider the cloud
- Start the backup: run the chosen software and wait for the process to complete
- Check the copy: make sure the VM copy was successful and can restore the environment.
Remember that the steps may vary depending on the recovery software you choose. Therefore, read the instructions for the brand you have chosen to understand how it works before you start.
How can Bot help?
Has your virtual machine crashed and you’ve tried all the solutions described so far in this article to recover it and have been unsuccessful with any of them?
Then it’s probably the right time for you to turn to a data recovery company and let professionals restore the drive and recover all the lost files for you.
However, it is important to bear in mind that when opting for a data recovery company, it is recommended to check that it has:
- Sterile environments and professional equipment: there are many companies offering data recovery services, but not all of them have the right facilities and the necessary equipment. It is essential to avoid the risk of further damaging the drive during the recovery process, making the problem worse
- Track record: companies with extensive experience in the market provide greater security in the data recovery process, as they already have a long track record in this area
- Positive reviews: it is wise to always check online reviews before selecting a data recovery company
An example of a company that meets all these criteria is Bot, which has highly qualified professionals, a clean room, more than a decade of experience in the data recovery sector and has received a 99% satisfaction rating from its customers.
Don’t waste time: start your VM’s data recovery process with us right now and join our +150k success stories!