Did your hard drive show up as RAW and become inaccessible? That means the volume no longer has a recognized file system (such as NTFS, exFAT, HFS+, or FAT32). Windows starts showing messages like “you need to format the disk” and won’t open the drive. The good news: you can safely recover your data — as long as your first actions are correct and non‑destructive.
Professional recommendation: if you need the files and don’t have a backup, avoid any operation that writes to the media (format, initialize, convert). On SSDs (due to TRIM) and on SMR HDDs, these actions can reduce or even prevent recovery. Prioritize data extraction before any logical repair. Need immediate guidance? talk to a Bot specialist for a free diagnostic.
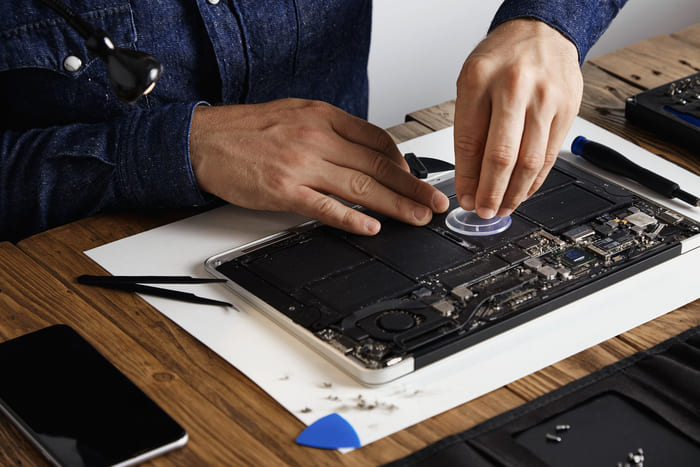
This issue is more common with external hard drives, but it also affects USB flash drives, memory cards, and even internal HDDs. The guidance below applies to any device that appears as RAW. If you’d rather not take risks, Bot Data Recovery® is ready to help — we have our own laboratory, international expertise, and the WhiteRoom® (a cleanroom that controls 99.97% of airborne particles) to work safely.
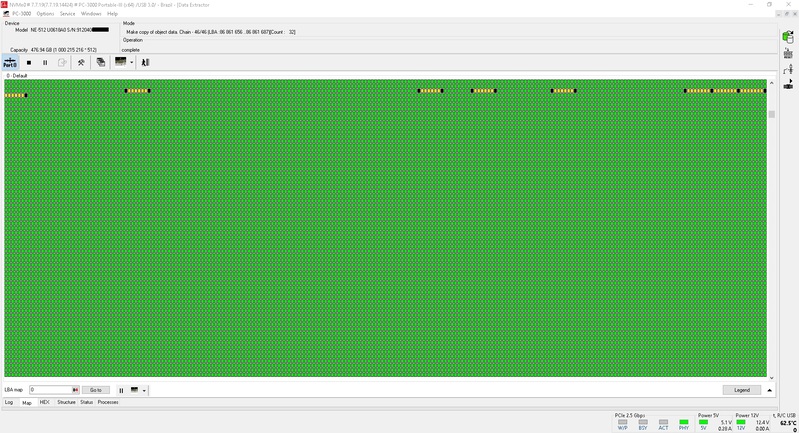
Before attempting anything, take a breath. RAW situations require caution and method, but there are safe paths. Bot works by creating a disk image/clone and using professional tools to preserve data integrity and restore safe access before any formatting.
What is a RAW hard drive?
A RAW drive is one that doesn’t have a readable file system (such as NTFS, exFAT, HFS+, or FAT32). Without that structure, Windows can’t locate directories or open files — the drive looks “lost” or corrupted. In short, RAW means the information about how files are organized was damaged or disappeared.
Every partition uses a logical table (file system) to store and locate data. If that table is missing or unreadable, the operating system can’t access anything. Therefore, a drive without a defined file system will remain inaccessible until it’s corrected — and the first safe step is to save the data.
Why does a drive become RAW?
Drives don’t become RAW “on purpose.” It usually happens due to unexpected logical corruption or a physical fault. Common causes include:
- Bad sectors caused by wear, impacts, or surface defects;
- Virus or malware infection that corrupts the file system;
- Power spikes and abrupt shutdowns that corrupt volume metadata;
- Interrupted formatting, partitioning, or repair processes;
- Hardware or software failures during write operations;
- Firmware errors in the drive that compromise internal boot information (system modules) and can make the volume appear RAW;
- Physical damage to the drive or to SATA/USB cables;
- Incorrect or incompatible configuration (BIOS/UEFI/CSM), preventing proper recognition;
- Corrupted MBR/GPT;
- Accidental disconnection of disks in RAID arrays, isolating one of the members;
- System updates that are interrupted or incompatible with a pre‑existing partition;
- Damaged partition table;
- Incorrect partition permissions (less common for RAW, but can mislead diagnosis).
What are the symptoms of a RAW drive?
It isn’t always obvious that a volume is RAW until you try to access it. Typical signs include:
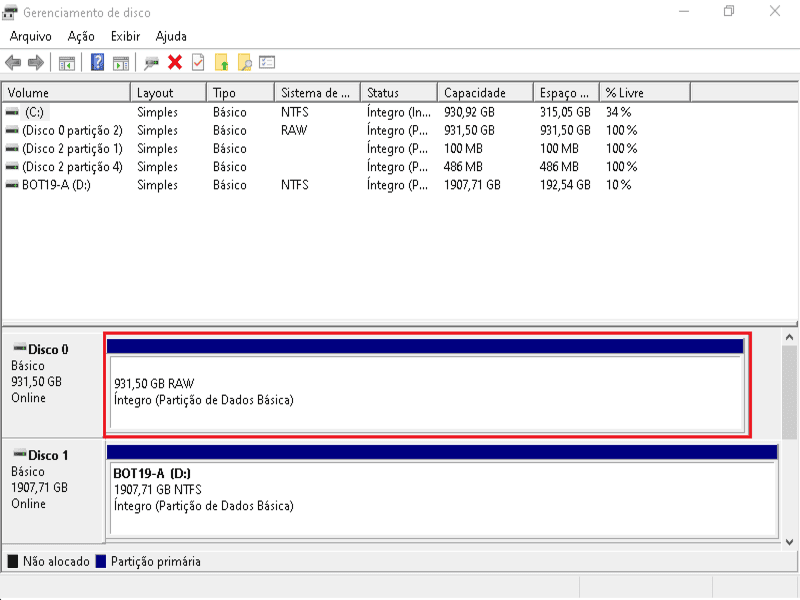
- Disk Management shows the partition as RAW (no file system), and
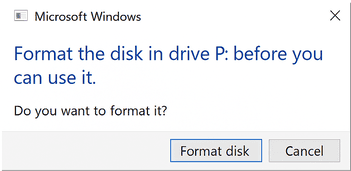
chkdskcan’t check it; - Windows Explorer displays “you need to format the disk before you can use it”;
- Another common message: “this volume does not contain a recognized file system”;
- In Explorer, the drive shows 0 bytes used/free;
- The file‑system type is missing.
How to fix a RAW drive
First, protect your data. There are ways to recover a RAW drive without formatting — but it all starts with avoiding writes and checking for signs of physical failure (clicking sounds, freezes, drops, extensive bad sectors). If you need professional guidance, contact Bot for expert support.
Using File Explorer
Use only for safe checks (no formatting):
- Open File Explorer and confirm whether the RAW drive appears;
- Do not click “Format” if you need the data and lack a backup;
- Try another port/cable/PC to rule out connection issues;
- If available, use a S.M.A.R.T./read‑only utility to assess the health;
- If the drive remains inaccessible, request a diagnostic before any destructive action.
Check and change the drive letter
In some cases, the RAW volume has no letter assigned in Disk Management, which prevents Windows from showing it in File Explorer. This can happen after power loss, improper disconnection, or boot errors.
How to try it:
- Open the Start menu and type “Disk Management” (or press
Win + Xand choose “Disk Management”). - Find the partition marked RAW and check whether it has a letter assigned (e.g., D:, E:).
- If it has no letter, right‑click and select “Change Drive Letter and Paths…”.
- Add a new letter (for example, Z:) and confirm.
- Close Disk Management, disconnect/reconnect the drive (or restart the computer).
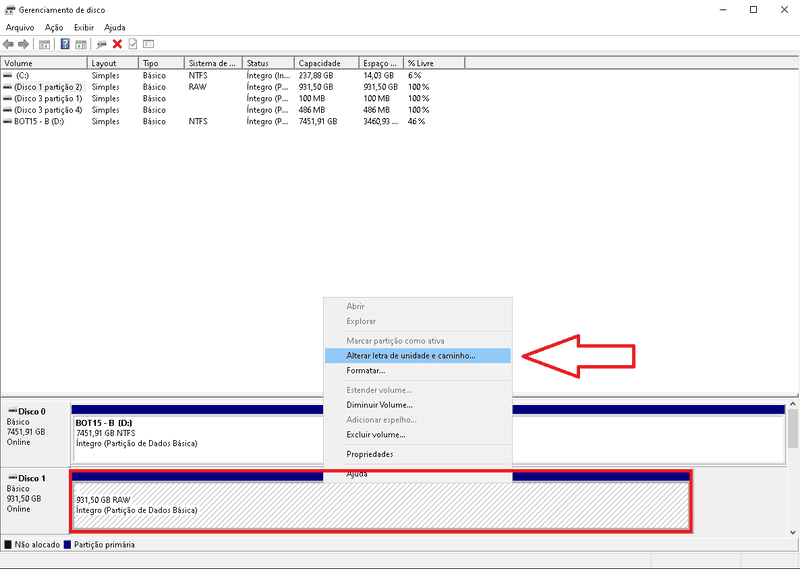
In some scenarios reported by users and technicians, this simple letter change makes the system recognize the volume again and restores access, as long as there is no severe structural corruption. ⚠️ Still, this step does not replace data recovery if the file system is damaged or there are bad sectors.
Using Command Prompt (CMD)
About CHKDSK on RAW: when the volume is RAW, Windows usually reports that chkdsk is not available for this type of drive. Avoid insisting if you suspect physical faults. Prioritize imaging/cloning and professional diagnostics.
- If you don’t need the data (or you already have a verified backup), skip CHKDSK and proceed to re‑creating the file system (last resort, below);
- If you need the data, don’t run commands that write to the media; contact Bot.
Formatting (use with care)
Last resort, destructive: only after saving your files or if you don’t need the data. On SSDs, TRIM can make recovery impracticable after formatting; on SMR HDDs, rewrites reorganize data in bands, hindering later analysis.
- Recover/extract the files from the RAW volume (top priority);
- Open Disk Management or use DiskPart (see next section);
- Re‑create the file system (NTFS/exFAT/FAT32, as needed) only once your backup is validated.
Using DiskPart in CMD
Example (NTFS, quick) — destructive:
- In the Start menu, open Command Prompt as Administrator;
- Type
diskpartand press Enter; - List volumes:
list volumeand identify the RAW volume; - Select the volume:
select volume N(replace N with the correct number); - Quick‑format to NTFS:
format fs=ntfs quick(optional:label=Data); - Wait for completion and verify in Disk Management.
Using Disk Management
Only after recovery/backup:
- Go to “This PC” → “Manage” → “Disk Management”;
- Right‑click the RAW drive and select “Format”;
- Choose NTFS (or exFAT/FAT32, as needed) and, if desired, use “Quick format”;
- Finish and confirm the drive is accessible.
I don’t know how to recover a RAW drive. What now?
If you’re not confident performing these steps, the best solution is to rely on Bot to recover your data. Even if the disk is RAW, our specialists use a cleanroom environment (WhiteRoom®) and professional‑grade tools to secure your information before any formatting.
Conclusion
Data recovery from drives that appear as RAW requires a careful assessment and the use of proper technical procedures. Before any attempt to format or repair, it’s essential to stop using the device and ensure the original data is preserved via a forensic image/clone. With the right method, access can be restored without compromising information.
When physical damage, bad sectors, or firmware issues are suspected, the work should be performed by professionals. That’s where Bot Data Recovery can help.
With in‑house labs and the exclusive WhiteRoom®, Bot performs diagnostics and recoveries in a controlled environment, safeguarding device integrity throughout the process.
We offer free shipping from anywhere in the United States, free diagnostics within 24–48 hours, and specialized technical support at every step.
Proven trust, real results:
- 200,000+ successful cases to date;
- 95% average satisfaction among our clients;
- Operations in Brazil, Portugal, and the United States with our own infrastructure;
- Reference for HDDs, SSDs, RAIDs, and physically damaged devices;
- Technical, human service with no fine print.
We hope this content helped you understand what it means when a drive shows as RAW and the safest ways to restore access.
Produced by the technical team at Bot Data Recovery, a multinational leader in advanced data‑recovery solutions.
Further technical reading:
• Western Digital — Steps to change a drive letter in Windows
• Microsoft — CHKDSK command reference