


If you work with storing and protecting large volumes of data, you have probably heard of RAID.
With RAID and NAS, a rebuild or an initialization without a diagnosis can reduce the chances of recovery. Before touching anything, see Bot’s RAID recovery, which starts with a free diagnosis.
RAID (Redundant Array of Independent Disks) is a technique used to improve the performance and reliability of data storage. It is especially important where data security is essential.
In this article, you’ll learn what RAID is, what it does and how it is set up.
What is RAID?
RAID is a storage technique that combines several hard drives or SSDs to increase speed, protect data, or both. The acronym stands for Redundant Array of Independent Disks.
The idea is to build a storage subsystem out of several individual disks, as if they were building blocks, so that the computer sees all of them as a single storage unit. In a RAID 0, for example, two 2 TB disks appear to the operating system as a single 4 TB drive; other levels give up part of that capacity for redundancy. There are different RAID levels for doing this, as we’ll see below.
The technique was presented in 1988 by three researchers from the University of California, Berkeley, in a paper called “A Case for Redundant Arrays of Inexpensive Disks (RAID)”. The term was later changed from “inexpensive disks” to “independent disks” to move away from the idea of “cheap disks”.
What is RAID for?
RAID is used to add redundancy, performance, or both. Redundancy means that the data (or the information needed to rebuild it) is stored on more than one disk in the array, so that if one disk fails, the data is still available on the others and the system can keep running normally.
Whether RAID offers more security, better performance or both depends on the level used. Let’s take a closer look:
More security
Redundancy is what makes RAID more secure. Even if one of the disks fails, the others keep the data available, either because they hold an identical copy (mirroring) or because they hold the parity information needed to rebuild it.
But keep in mind that RAID is no substitute for a backup, which remains the best protection for your data. RAID does not protect against accidental deletion, viruses and ransomware, or human error, nor against problems that hit several disks at once, such as a power surge or a controller failure. So the data can still be lost entirely.
Better performance
RAID can also increase read and write speeds by spreading the work across several disks, but this depends on the level used, as we’ll see below.
Redundant RAID levels also improve availability: when a hard drive or SSD fails, the system keeps working while the faulty disk is replaced and its contents rebuilt.
What types of RAID are there?
Let’s look in more detail at how RAID works and at the three basic techniques it uses: striping, mirroring and parity.
Striping
Striping splits the data into blocks and spreads them across different disks. The data is not duplicated, so the disks can read and write their share of the work in parallel and process the data faster.
The focus of striping is therefore read and write speed, which makes the system faster. However, it sacrifices security and reliability: if one hard drive or SSD fails, the data on the whole array becomes inaccessible.
In other words, striping on its own provides no redundancy. That’s why some people don’t consider it true RAID.
Mirroring
With mirroring, as the name suggests, the data is mirrored across the disks in the array. In other words, an identical copy of the data is kept on at least one other disk.
Its main purpose is redundancy, which makes the data much safer. On the other hand, write speed does not improve, because every write has to be repeated on each disk. Storage costs are also higher, since a large share of the disks holds nothing but copies.
Parity
Parity RAID calculates extra information (parity) from the data and stores it alongside it. If a hard drive or SSD fails, this parity information makes it possible to rebuild the missing data.
Parity is different from mirroring, which keeps a complete copy of the data on other disks. Parity RAID strikes a balance between security, performance and capacity: it can rebuild a failed disk while using much less space than full copies.
What are the RAID levels?
The Berkeley paper that introduced the term RAID already described several RAID levels. Each one represents a way of arranging the disks and the technique used to gain redundancy, performance or both.
There are more levels, variations and combinations today, but these are the main ones:
RAID 0
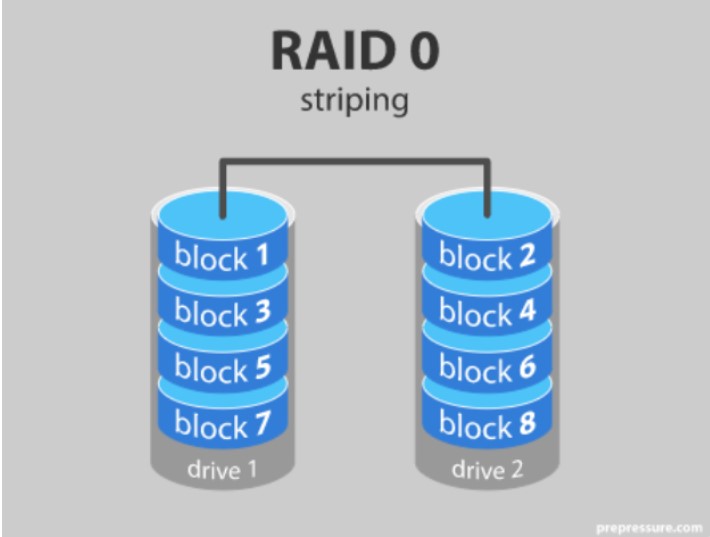
In RAID 0, also called striping, the data is split across all the disks so that they read and write simultaneously.
It therefore uses striping alone: it improves performance but sacrifices security, since there are no copies on the other disks. That’s why many people don’t consider RAID 0 true RAID.
RAID 0 is typically used in applications that handle large volumes of data and need high speed, such as image processing and video editing.
Advantages
- Increases read and write speed;
- Uses the full capacity of every disk, with no space set aside for redundancy;
- Easy to set up.
Disadvantages
- If any disk fails, all the data in the array is lost;
No mirroring or parity.
Source: Dicas de Infra
RAID 1
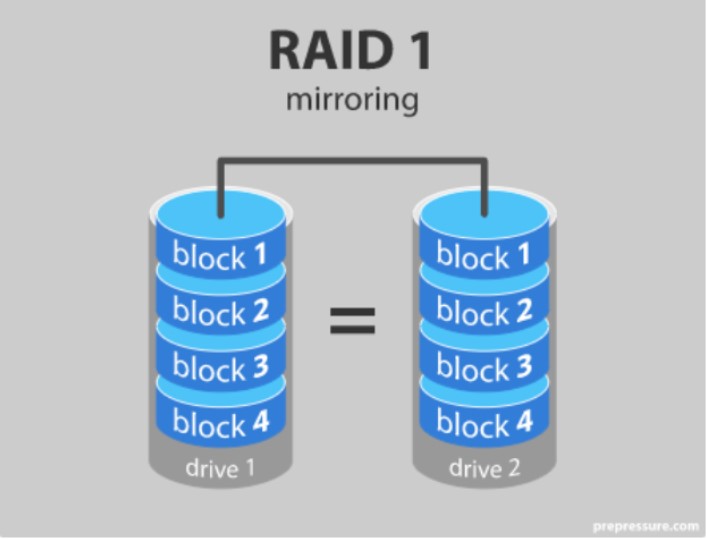
RAID 1 protects against physical failure of a drive. At this level, the data is copied to one or more other disks in the array, and every change is written to all of them.
It therefore uses mirroring, which puts data security ahead of speed, since every write has to be made on each disk.
RAID 1 is one of the most widely used levels, especially in systems that cannot afford data loss or downtime. Its job is to keep the machine available even when a disk fails.
Advantages
- Protects data with identical copies on the other disks;
Keeps the machine running if a disk fails.
Disadvantages
- Usable capacity is that of a single disk (half the total in a two-disk array);
- Increases the cost of adding storage;
- Write speed is no better than that of a single disk.
Source: Dicas de Infra
RAID 2
RAID 2 is one of the levels that has fallen out of use, because modern disks already include their own error correction. Like RAID 0, it splits the data across the disks, but it adds error-detection and correction codes (Hamming codes), which give extra protection if a disk fails.
Advantages
- Adds a layer of data protection;
Increases read and write speed.
Disadvantages
- Obsolete, since modern disks already correct errors on their own;
Uses error-correction codes instead of mirroring or simple parity.
RAID 3
From RAID 3 onwards, all the levels use parity. In RAID 3, the data is split into very small pieces (bytes) across the disks, and the parity is stored on a dedicated extra disk, which is used to rebuild the data if one of the drives fails.
Advantages
- Increases read and write speed;
Protects against the failure of one disk.
Disadvantages
- Complex to implement in software, and rarely used today.
RAID 4
RAID 4 is another level that uses parity. It is similar to RAID 3, but the data is split across the disks in larger blocks and can be rebuilt using the parity stored on a dedicated extra disk.
You could have three disks storing the data, for example, and a fourth storing the parity. In other words, you only need one extra disk to protect the data, whereas RAID 1 needs a full copy of every disk.
Advantages
- Protects data with parity;
- Lowers the cost of data protection.
Disadvantages
- If a disk fails, rebuilding the data is slower and more complex than in RAID 1, where the data is already mirrored;
The dedicated parity disk becomes a bottleneck, and the technique has been superseded by RAID 5.
RAID 5
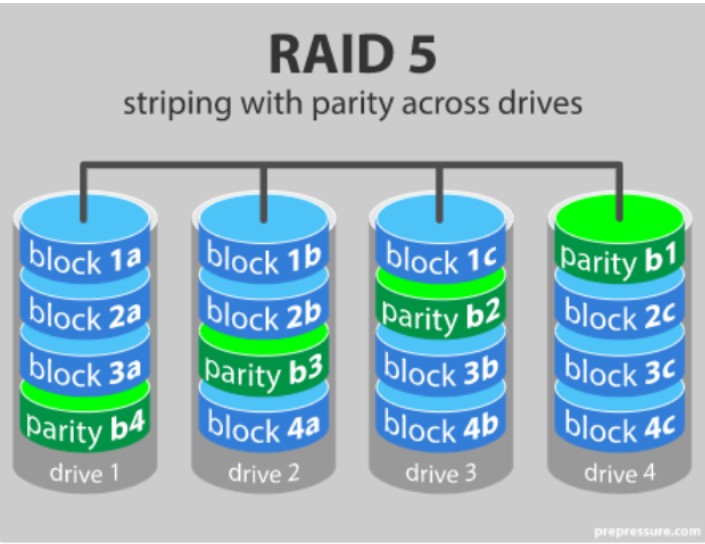
RAID 5 is an evolution of the previous levels. It is also known as striping with distributed parity.
Here, the parity is not stored on a dedicated disk as in RAID 4. Instead, it is spread across all the disks in turn. If a disk fails, a process called a rebuild recreates its data on a replacement disk.
However, rebuilds tend to take a long time, and if another drive fails during the rebuild, the data can be lost.
Advantages
- More robust data protection than the earlier parity levels;
- Fast reads;
- Keeps the data available if one disk fails, even during the rebuild (although with reduced performance).
Disadvantages
- Writes are somewhat slower because of the parity calculations;
Rebuilds after a failure are slow and put extra strain on the remaining disks.
Source: Dicas de Infra
RAID 6
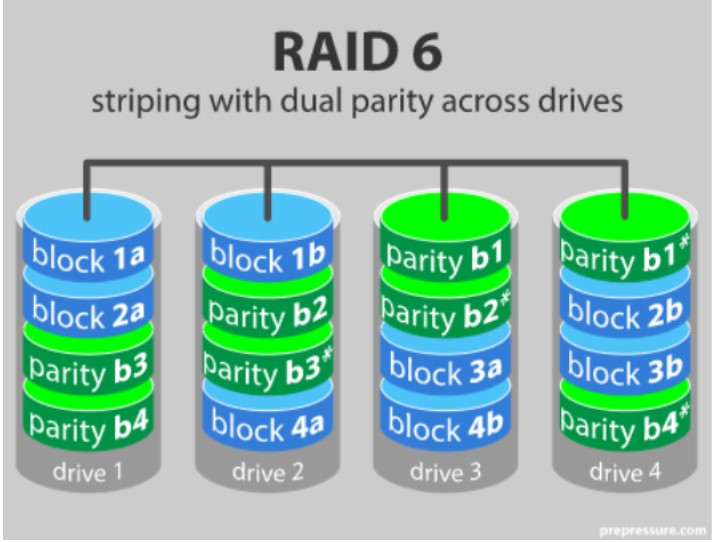
RAID 6, also called striping with double parity, works like RAID 5 but can survive two drives failing at the same time.
This is because RAID 6 stores two independent sets of parity, spread across all the drives. So the array survives the failure of any two disks, including a second failure during a rebuild, and the data stays accessible while the drives are being restored.
Advantages
- Fast reads;
Keeps the data available even if two disks fail.
Disadvantages
- Writes are slower than in RAID 5 because of the extra parity calculations;
Rebuilds are complex and slow.
Source: Dicas de Infra
RAID 10
RAID 10 combines RAID 1 and RAID 0, with the advantages and disadvantages of both. The data is mirrored onto secondary drives (as in RAID 1), which makes it safer, and also striped across the mirrored pairs (as in RAID 0) to increase speed.
This means that when a disk fails, the rebuild is much faster, because the data is simply copied from its mirror. On the other hand, storage costs more, since half the capacity goes to mirroring.
Advantages
- Protects data through mirroring;
Increases transfer speed and shortens rebuilds.
Disadvantages
- An expensive way to get redundancy;
Higher storage cost (requires at least 4 disks).
How is RAID set up?
Now that you understand what RAID is and which levels exist, let’s look at how a disk array is set up in practice.
RAID can be implemented in two ways: in software or in hardware. To choose the best option, assess the company’s infrastructure, what you want from RAID (security or performance) and the resources available, since each solution has a cost.
Whichever option you choose, it’s best to rely on qualified professionals for this kind of setup. A single mistake can disrupt the disks or erase their data, so be careful: creating a RAID array erases the data on the disks that make it up.
Here’s how each approach works:
In software
In a software RAID, the operating system manages the array; in Windows, this is done through Disk Management. This approach tends to be more flexible and cheaper, but it can affect the machine’s performance, because the processor has to work out where each piece of data goes.
You need two or more disks, ideally with the same speed and capacity, and with no data you want to keep. Once they are installed in the computer, you can configure the RAID in Windows.
Open Disk Management (right-click the Start button and choose “Disk Management”). Right-click one of the disks with unallocated space and choose “New Striped Volume” (RAID 0) or “New Mirrored Volume” (RAID 1), depending on what you want.
Next, select the other disks that will be part of the array and set the size. Assign a drive letter and finish with a quick format. Windows will convert the disks to dynamic disks and erase what is on them. Once it’s done, your RAID is up and running.
In hardware
A hardware RAID tends to be more efficient, but also more complex. You need at least two disks and a RAID controller (a dedicated card or the one built into the motherboard), which supports levels such as RAID 0 and RAID 1.
First, install the hardware and connect the disks to the ports managed by the RAID controller. Then enable RAID mode: in the motherboard’s BIOS/UEFI settings, change the SATA mode from “AHCI” or “IDE” to “RAID”. On a computer that already has Windows installed, this change can stop the system from booting, so check the manufacturer’s instructions first.
Then, during the POST (Power-On Self Test), press the key shown on screen to open the RAID configuration utility. There you can create the RAID volume, choose the level (for example, RAID 0 or RAID 1) and set its size. Creating the volume erases the data on the disks.
Finally, install or configure the operating system. The Windows installer may not recognize the RAID volume and will ask for a driver, so have the controller driver ready on a USB stick. Once installed, the operating system will see the disks as a single drive.
Now you know what RAID is, what it does and how to use it. RAID is mostly used by companies and organizations that handle large volumes of data and need both data security and performance.
But anyone can set up a RAID, as long as they have the technical knowledge — or professional help.
RAID data recovery
Bot has reception points in Lisbon, Coimbra, Porto and Braga. As well as RAID data recovery, Bot also provides data recovery for hard drives, SSDs, memory cards, USB sticks and devices affected by ransomware.
Bot also offers a free standard diagnosis and free pickup of your devices (islands not included). So if you need to recover data from any RAID configuration, trust the specialists at Bot, with more than 200,000 cases.


