With everything that can go wrong when dealing with computers, it is essential to have a simple and reliable way of backing up your Mac’s files and preferences, don’t you agree? Apple has created Time Machine for this purpose.
Introduced with OS X 10.5 Leopard, the Time Machine backup application creates backup copies of your hard disk and stores them in the cloud or on an external drive.
In this article, learn what Time Machine is, what it is used for, how to configure the preferences, what you can restore (and how to restore it, step by step).
What is Time Machine?
Time Machine is an application that creates backup copies of your files so that you can restore them later.
You can use the application to back up and restore the entire system or just your important files.
You can also use it with iWork, iLife and many other applications to restore files without leaving those applications.
You can even use Apple’s AirPort to store your backups on a network drive.
What is Time Machine for?
Time Machine stands out among most backup applications because it captures exactly what was on your Mac at any point in the past, making it easy to recover files, emails or archives that may have been inadvertently deleted.
The application saves your data every hour, although it only keeps the last backup made in a day. In this way, it only keeps daily backups for a month before only keeping weekly backups.
How do I back up with Time Machine?
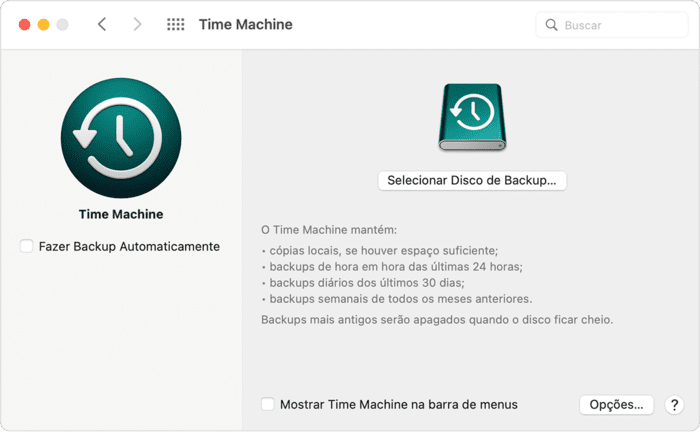
To enable Time Machine to make backups on your PC, follow the steps below:
- Select the Time Machine icon in the menu, Apple > System Preferences
- Click on Select backup disk
- Select the disk you would like to use as a Time Machine backup
- Check the “Back up automatically” box.
How long does Time Machine backup take?
The first backup can take several hours, depending on how many files you have. But at least you can continue to use your computer during the procedure.
After that, future backups will be quicker to complete, as Time Machine only backs up the files that have changed since the previous backup.
How do I configure Time Machine’s backup preferences?
Time Machine will start backing up after the settings below. Remember that, the first time, the process may take several minutes.
After the first copy is made, Time Machine will access the external disk to perform small hourly updates, in addition to daily backups of the last month and weekly backups of previous months.
Old saved copies are deleted as soon as the disk is full.
Delete items and back up only what you want
Even with the few options Time Machine offers, you can still choose between what you want to keep and what you prefer to exclude.
If you want to exclude an item from your backup, just go to “System Preferences” and access Time Machine. Then click on the “Options” button, then add (“+”) to mark an item to be deleted from the backup.
If you change your mind and want the item to be saved, select it and click the remove button (“-“).
Check the status of your backups
To keep an eye on the status of a disk’s backups and check that they are in good condition, you need to display them in the Time Machine menu bar at the top of the screen.
To do this, go to “System Preferences” in Time Machine and select “Show Time Machine in the menu bar”.
Then hold down the ⌥ Option key and click on “Check Backups”.
If you see an exclamation mark (!) in the center, this indicates that there was a problem with the last backup.
If the exclamation mark doesn’t appear, everything went fine.
How to use Time Machine to restore files
You won’t have any problems restoring files using Time Machine if you always keep your backups up to date.
First, you will enter Time Machine and browse through all your stored files, folders and programs.
To do this, just open the Finder, go to “Applications” and click on Time Machine. You can also open Spotlight (by pressing ⌘ Command and Spacebar at the same time), type in Time Machine and click on the app.
In the left-hand corner of the application screen, you will see the dates on which the backups were made and you can browse the dates on which the resource performed the saves.
At the bottom of the screen, you can access the options to cancel the session and restore a specific program or file.
You can also restore files made by Time Machine without having to enter the application: simply access the disk on which the backup data is stored via the Finder and drag the items wherever you want.
However, this is a procedure that requires an understanding of the structure of the system – as well as knowing the difference between copying and restoring.
In the application, you can browse Time Machine’s dated folders and explore everything that is stored.
Remember that Time Machine only updates your folders, rather than copying everything on your PC. What’s more, you can automatically or manually restore any items you miss.
You can also use cloud storage services to save your documents, files and other important data.
What can be restored from Time Machine
With Time Machine, you can restore:
- Specific files: when you have mistakenly deleted an important file and want to restore only that one;
- Restoring your Mac to the state it was in during a specific backup: when you have reinstalled macOS on your device and want to return everything to the way it was before;
- Time Machine backup to a new Mac: when you want to import all the data from your Time Machine backup to your new Mac.
How to restore files with Time Machine
To restore files using Time Machine, you can follow the steps below:
- Choose Time Machine from the Apple menu > System Preferences;
- Check “Show Time Machine in the menu bar”;
- Click on the Time Machine icon in the menu bar;
- Find your file or folder and click on “Restore”.
Remember that you can define which files and folders to exclude in the “Time Machine Options”.
How long does the restoration take
There is no definitive answer: the exact amount of time depends on how much data is backed up and the speed of your connection to the external drive.
So, in some cases, it can take an hour to restore data from a Time Machine backup, and up to 10 hours in others.
How to set up Time Machine restore preferences
To change these preferences, go to the Apple menu > System Preferences and click on Time Machine.
| Option | Description |
| Backup Automatically | Configure Time Machine to back up your files automatically |
| Select Backup Disk, Select Disk, Add or Remove Backup Disk | If you haven’t set up Time Machine yet, click on “Select Backup Disk” to set up a backup disk. Repeat the steps for each disk you want to configure.
If you have already set it up, your backup disks are listed, and information about each backup disk is displayed. To select, add or remove backup disks, click on “Add or Remove Backup Disk”. |
| Option | Set options to exclude itemns form backup and to perform backup while battery is running. |
| Show Time Machine in the menu bar | Add a Time Machine menu to the menu bar along the top of the screen. |
Conclusion
Time Machine is great for making and restoring backups. But although it works well for simple tasks, it can fail when dealing with something substantially more complex, such as serious data loss.
If this happens to you, the only way out is to turn to a professional recovery service, like the one we offer at Bot.
With us, you will get your data back and we will give you an estimate within 48 hours, with no risk of damaging your hard disk – as our team of highly qualified professionals works in a fully particle-controlled environment.
In addition, we are on hand to answer your questions on our social networks.
Don’t take any chances: trust those who have more than a decade of experience in data recovery and have successfully handled more than 100.000 cases. Start your recovery with Bot now!